Pages

Tuesday, July 26, 2011

Fat Quarter Bags

I made a pile of fat quarter bags in May to give away as gifts in June.  Despite the fact that they were given away I'm just now finishing the blog post for them.  I'm not always timely...so don't be too surprised when I put up a post of the sewing I did for Christmas!

DSC_4434

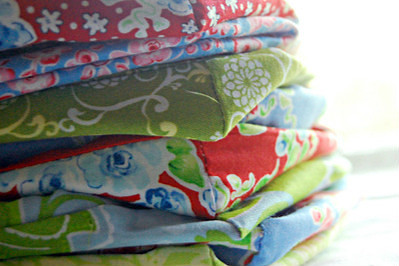
I had some lovely fat quarters left over from the sewing I did at Christmas and wanted to make something that would be appropriate for a wide age range (the youngest recipient was 3, the oldest recipient was older ;-)).  

project 1 fabric

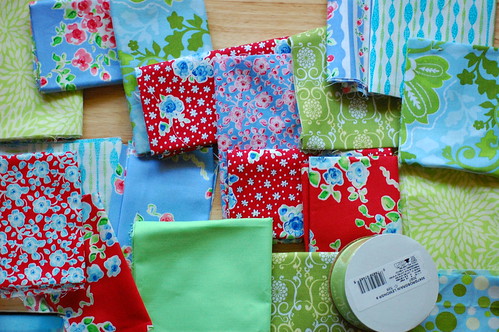
After thinking on it and looking through the blogs I subscribe to I saw this tutorial for Fat Quarter Bags from Amy Smart on her blog, Diary of a Quilter. And I thought, "That's it!"  But I can't leave well enough alone and I made a few changes. :-)

So, here's what I did:

1. Added sew in interfacing to give the bags more body.  I imagine iron on interfacing, fusible fleece, quilt batting, re-purposed jeans or another hefty material would work as well.

2. Added a pocket, because you always need a pocket, right?  The pocket was sewn on to the fabric and interfacing for a bit more stability.

DSC_4438

3. The bags are totally reversible.  I boxed the corners (both the outside fabric and the lining) prior to turning it right side out.

4. I left the opening to turn the bag right-side out at the top (between the handles) instead of along a side, then top stitched it closed. I thought this worked out better since the bags are reversible.

DSC_4445 edited

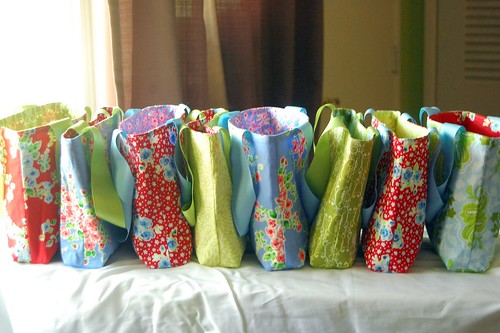
The directions for the tutorial worked really well, but I think if I make these again I'm going to construct them a bit differently. I'll probably sew the inner and outer bags separately, then sew the bags together while adding the handles. I'm thinking that with the alterations to the tutorial I made it'll be a bit easier to put it together that way. I learn something new with each project, even if it's that I prefer to do things using a different method!

Until later!

Thursday, July 21, 2011

WiP Wednesdy #7

WIP Wednesday at Freshly Pieced

We really enjoyed the break in the hot weather that we had over the weekend, especially since it was Arts Fest and People's Choice weekend.  We had a great time walking through the festivals and seeing all the artists.  But now I feel like I'm melting again!

I was hoping to finish the placemats, sew a robe for Puppy Boy using the pattern by Dana from MADE and work on the Challenge block for the Skill Builder Sampler hosted by Leila at her blog Sewn.  Here's where things stand with those:
-I got the binding pinned to the placemats, but not sewn down yet (did I mention there's 8...and that sewing binding is my least favorite part?  It's just so tedious!)  So a little progress, but not done yet.
-Still in the gathering/planning stage on the robe.  The pattern is printed out, but it's not assembled yet, and I'm going to need to make some alterations since Puppy Boy is a pretty tall dude for a 3 year old.  The towels are bought, but still need bias tape though.
-I got the Challenge Block done, and I love it!  I also finished Block #4, and I'm really happy with how well my points line up in the pinwheels.  You can read all the nitty gritty details here if you want.

Challenge Block Block 4


I'm not sure that I'm going to be doing a lot of sewing this next week.  I really want to get my Teacher Work Sample done this week.  It's going to be a bit of a pain, I have to reconstruct some stuff due to a computer hard drive crash. :S So, we'll see how it goes.  Maybe some sewing will be study break time, but it's more likely I'll be doing something to try to keep cool and play with the kiddo.

On Hold:
-My mom's jewelry keeper (Christmas gift) I'll pick this up when I'm done with the placemats
-stacked coin throw quilt

WiP Recap:
Last week's total: 5
Finished this week: 2
New this week: (1...maybe...hopefully)
This week's total: 3, maybe 4

Until later!

Skill Builder Sampler - Bonus Block & Block 4

BWS tips button

A week ago Friday Leila challenged us to design a block on our own as a Challenge Block for the Skill Builder Sampler.  The challenge was to design our own 12" finished block using squares, rectangles and triangles.  How this is different from the previous blocks we've sewn for the sampler is that the block should be designed using a 4 x 4 grid pattern instead of the 3 x 3 that the previous blocks have been based on.

So I started sketching and after some time, came up with a block I wanted to try.  I started playing with fabric choices and decided that I liked the block better upside-down.

Sketches for Challenge Block
Then I figured out the best way to cut and sew the fabric and made a cut list for myself.  I thought about doing an inset seam for the gray along the bottom, but didn't feel like going through the trouble right now of figuring it out.  I'm really happy with how this turned out, and may do a different quilt later expanding on the idea.  The sewing looks better in person than it does in the photo, I think it needs another good press!

Challenge Block

For Block #4 for the skill for the Skill Builder Sampler is more half square triangles.  To practice half square triangles (HST) the block for the week is a pinwheel block.  We used a tutorial for a block called Pinwheel Parade by Vanessa of V & Co.  I did this pretty much according to the tutorial, but used 5 colors for the 5 pinwheels instead of one (well, I am making a rainbow quilt!)  The biggest decision was which fabrics to use and where to put them in the block.  Once I figured that out it was all about the sewing.  This is one of those blocks where it pays to pin and go slooooow where the points intersect (I was hand cranking that needle at the intersections!)  I am super happy about how the points line up!

Block 4

I think that's all I've got for this week.

Until later!

Tuesday, July 12, 2011

WiP Wednesdy #6

WIP Wednesday at Freshly Pieced

Well, let's try this again.  Some of you may have noticed that I posted late Monday night/early Tuesday morning...Then I realized what day it was and took the post down, thinking that it might change, but it didn't so here it is again!

Is everyone out there staying cool?  It is HOT here!  I wish we were back in Oregon enjoying the weather we had there last month when we were visiting.  Below is a picture I took while on a day trip to the Oregon coast.

Oregon Coast

So, what sewing have I gotten done this week?  Not a darn thing.  In between dealing with the heat (no AC), a kiddo who needed Momma snuggles while sick with a stomach bug and working on my Teacher Work Sample (the last thing I need to get done to finish my teacher licensure program), I did not do any sewing.  None.  That means that the I still haven't finished up the wedding gift placemats.  Sigh.  I really need to get those done.  Good thing the newlyweds are really understanding!

What do I want to do this next week?  This next week (If I get enough homework done) I'm hoping to get the placemats done, sew a robe for Puppy Boy using the pattern by Dana from MADE and work on the June bonus block for the Skill Builder Sampler (hosted by Leila on her blog Sewn).  That's what I would like to do, what I'm hoping to do, but we'll see what actually gets done!

On Hold:
-My mom's jewelry keeper (Christmas gift) I'll pick this up when I'm done with the placemats
-stacked coin throw quilt

WiP Recap:
Last week's total: 3
Finished this week: 0
New this week: (2...maybe...hopefully)
This week's total: 3 (although, maybe, hopefully, 5)

Until later!

Wednesday, July 6, 2011

WiP #5

WIP Wednesday at Freshly Pieced

I hope that everyone had a great 4th of July, we really enjoyed our local fireworks, hanging out in the pool and eating summer treats.

I had a grand time planning out and sewing my blocks for the Skill Builder Sampler (hosted by Leila on her blog Sewn. Yes, we only had one block, but Churn Dash is probably my favorite traditional block, so I had to make more than one! And, of course, one of them had to be a variation. You can read more about the blocks and the process of sewing them here

Churn Dash Blocks

Unfortunately I still haven't finished up the wedding gift placemats.  Since we won't be making a block for the Skill Builder Sampler this week I'm going to get the placemats done this next week...but don't hold me to it!

Coming Up: If I get the placemats done and I have time (I've got to spend time working on my Teacher Work Sample, I'm working on my teaching license and need to get this done!) I think I'm going to make a robe for Puppy Boy using the pattern by Dana from MADE.  We've got a backyard pool (15 feet diameter, 30 inches deep) and while he loves the water, he gets really cold so I think it would be really useful!

On Hold:
My mom's jewelry keeper (Christmas gift) I'll pick this up when I'm done with the placemats
stacked coin throw quilt

WiP Recap:
Last week's total: 4
Finished this week: 1
New this week: 1 (maybe)
This week's total: 3, maybe 4

Until later!

Skill Builder - Block #3

BWS tips button

For Block #3 for the skill for the Skill Builder Sampler is half square triangles.  To practice half square triangles (HST) the block for the week is the Churn Dash.  I was really excited to see this block, in fact I think it's my favorite traditional block.  Every time I visit my parents I admire the Churn Dash square in the Civil War sampler quilt my mom made for the bedroom we stay in. (Mom's been quilting since 1995, I'll always remember the year because the first quilt she made was to celebrate graduation from high school!) Anyway, back to the block of the week: Churn Dash, love it!  I think it's amazing the way the look of the black can totally change based on the colors of the fabric used, I suppose that's true for a lot of blocks though. ;-)

Despite loving this block as it is I wanted to explore variations too.  So I broke out the graph paper and started sketching and coloring.  All variations started with the same basic bones.  Some of the variations are just different color values (light vs. dark) in different locations.  In others more HST were added to various locations in different orientations.  I also played with the location of the background material, switching the orientation of the sub-units.  I spent an evening coloring different configurations for the block before stopped.

I knew that I wanted to do one according to the directions and one variation.  As I was sketching and coloring I asked Puppy Boy (my three year old) what his favorite was.  And he had a definite favorite, no question.  Decision made, that was the variation.

scan0001
A sample of the variations I sketched.

It was fairly easy to pick the fabrics for the first block.  I knew that I was going to use white for the background, so I just need to decide what to use for the other fabrics.  For the blocks each week I'm trying to use fabrics in that haven't been used in previous blocks (obviously, this won't work for vary much longer!)  So, looking at what I had left, with the addition of the dark purple Kona I picked up earlier that day, I was really drawn to the purples.  I also pulled the purple I used for the Log Cabin (Block #1) for a medium value and played around with the fabrics.  I thought that I wanted a color fabric in the center, but it just wasn't working for me.  So I figured I go for contrast and kept my dark and light purples.  I continued to fold and rearrange until I decided which fabric I wanted in which location.  I'm really happy with how it turned out:

Churn Dash

For the variation block I wanted to use colors very similar to how I sketched it for two different reasons: 1. I wanted to make it look as close to the sketch as possible for Puppy Boy; 2. It reminded me of the poppies the Veterans of Foreign Wars sell.  This tradition started after the Flanders and World War I.  It didn't turn out quite the way I envisioned, but I'm still very pleased with it:

Churn Dash Variation


I can see myself making a quilt with nothing but variations of Churn Dash...with a star, floating, log cabin in the center, another churn dash on the insideGrecian (scroll down), or all the other variations I dreamed up.

Until later!